Want to learn all about Google Map trip planning? I hope this guide helps!
You’re planning a trip to an exciting new destination.
You’ve bookmarked several blogs that recommend fun activities and must-see attractions.
You have a list of restaurant recommendations from a friend who visited the area last year. And, somewhere in your phone, you’ve jotted down a note about the cool hotel you saw on Instagram.
Now it’s finally time to create your itinerary!
…But you have no idea where to start.
Wouldn’t it be great if you could save and access all of that previous information in one convenient location?
Did you know that’s exactly what you can do with the Google maps trip planner?
If you’ve never tried planning a trip on Google maps, you’re missing out on one of the best online travel tools. Best of all, it’s absolutely free!
Keep reading for your ultimate guide to Google map trip planning and discover just how easy it can be.
Here we go then: how to plan a trip on Google Maps!
Interest in planning a Google itinerary? You might also enjoy these:
- 101 Ways to Say Good Luck on Your New Journey
- 20 Benefits of Solo Travel
- 50 Fascinating Facts About Travel
- 75 Essential Things to Pack for Travel
- Key Features of the Experience of Travel
- 100 Reasons I love to Travel (& You Will Too)
1. Create Your First Google Map
No doubt you’ve been using Google maps for years. But maybe you’ve never planned a trip itinerary with Google maps!
Heck, maybe you didn’t even know this was a feature!
To get started, make sure you’re logged into your Google account (if for any reason you don’t have one yet, this link will get you set up with just a few clicks).
Next, visit the main Google maps page.
It will automatically detect your location and show you the surrounding area. Don’t worry about typing in your destination just yet — we’ll get to that shortly!
Look at the top left corner and you’ll see a search bar and an icon with three horizontal bars.
Click on the icon and select “Your Places,” which you’ll find a little more than halfway down the drop-down list.
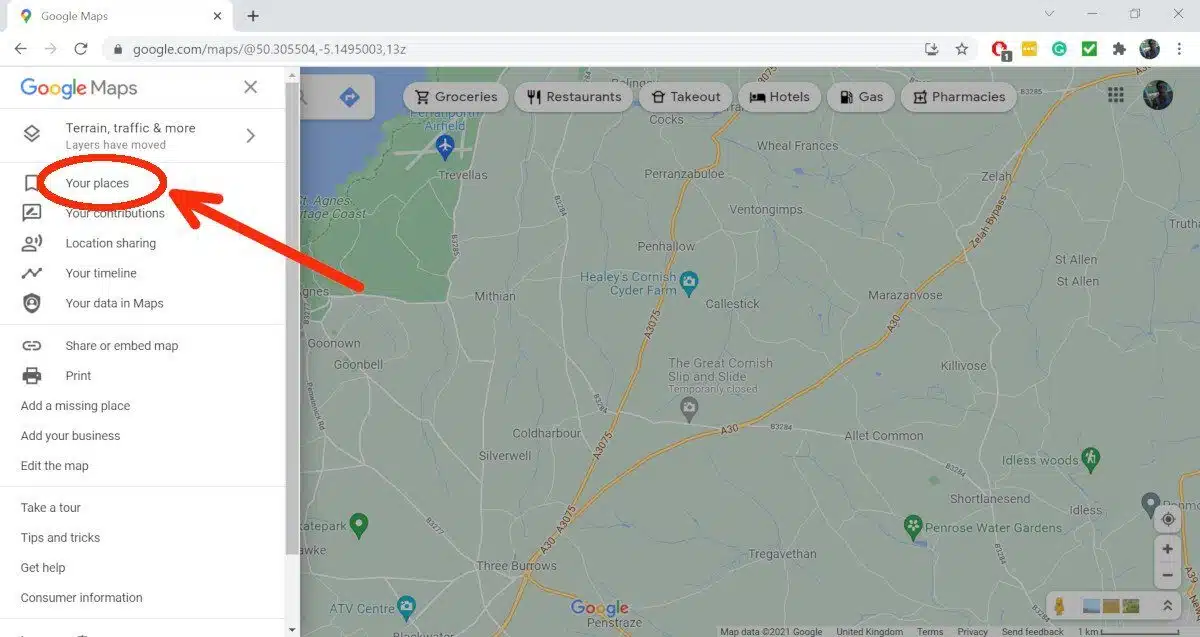
Planning a trip on google maps is easier than it first seems! Step 1: Create your map!
Four options will appear: Labeled, Saved, Visited, and Maps.
Click on “Maps” on the far right side. You’ll probably see a message that says “No Maps.”
That’s okay! Glance down to the bottom of the menu and you’ll see the option for “Create Map.”
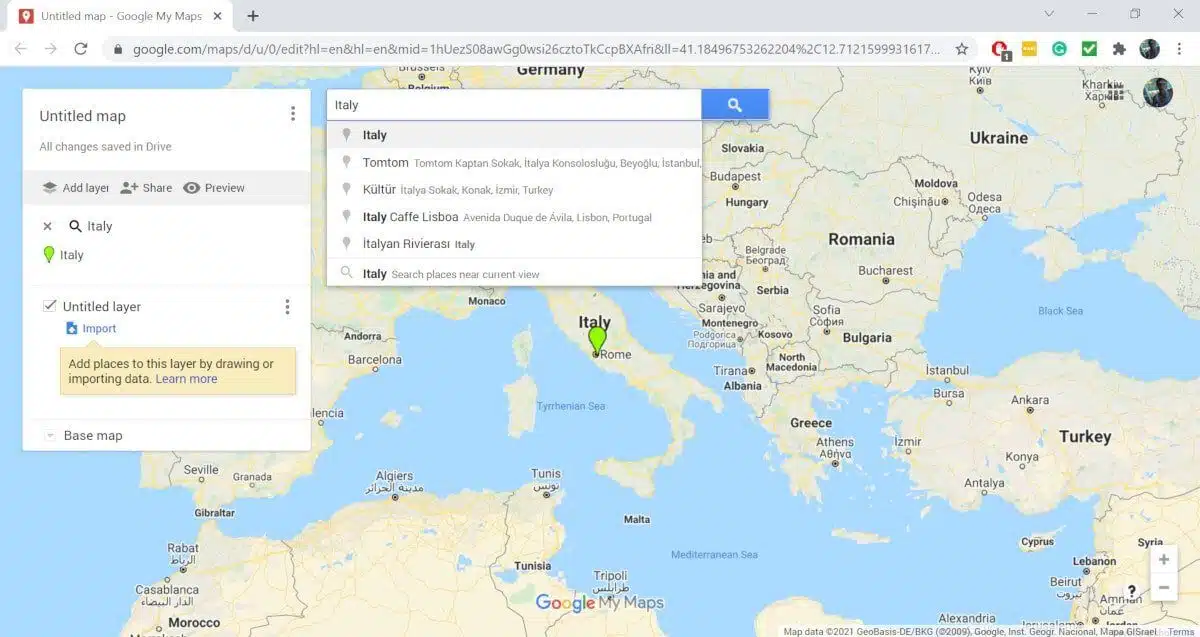
This will open a new window, where you can enter a title and description for your map by clicking on “untitled map” in the top left corner.
You’ll have to find the actual location for your map too!
Do this by searching for a particular place in the search bar or navigating there yourself by clicking and dragging.
Depending on your destination, you could have a broad map of the whole country, or you can create specific maps for each city on your itinerary.
For example, you could create one map for an overview of Italy, followed by individual maps for Rome, Florence, and Venice.
The key is to choose a system that works for you and helps you stay organized.
Once you’ve entered the map title and description, click the “Save” button. Congratulations — you’ve just created your first Google map!

Creating categories is a crucial part of how to plan a trip with Google maps.
2. Select Categories for Your Google Itinerary
The next step is to choose certain categories for locations you’ll save in your custom map (more on how to do this in a second).
Start with the basics, such as:
- Hotels
- Restaurants and bars
- Coffee shops
- Shopping areas
- Airports
- Train and bus stations
These “essentials” form the backbone of any trip! You might also consider adding other categories based on the type of trip you’re planning and the number of stops you’ll make.
For example:
- Cities and towns (for a long road trip)
- Scenic areas for photo ops
- Museums and attractions
- Outdoor activities and sports
- Camping and hiking areas
- National parks
- Popular beaches or lakes
- Heritage tourism sites
- Car rental agencies
Choose the categories that make the most sense for your trip, or add other relevant ones that aren’t on that list.
Once you know which categories you want to use, click the “Add Layer” button on the left side of the screen.
The idea is to create a custom layer for each category.
Click on the “Untitled Layer” box and start entering each individual category. This will make it super easy to retrieve these layers later on.
You have your map and categories. The next part of Google itinerary planning is adding specific things you want to see and do along the way!
3. Add Your Must-See Locations
Now comes the fun part:
Filling in all the exciting places you want to visit!
This is the time to organize all those random ideas and recommendations you’ve got saved on your phone into one easy-to-use map.
Pool through your favourite travel blogs, YouTube channels, guidebooks, and social media channels for inspiration.
Maybe you already have a few bucket list items you plan to tick off the list during this trip?
Whatever the case, write it all down and get ready to add everything to your map!
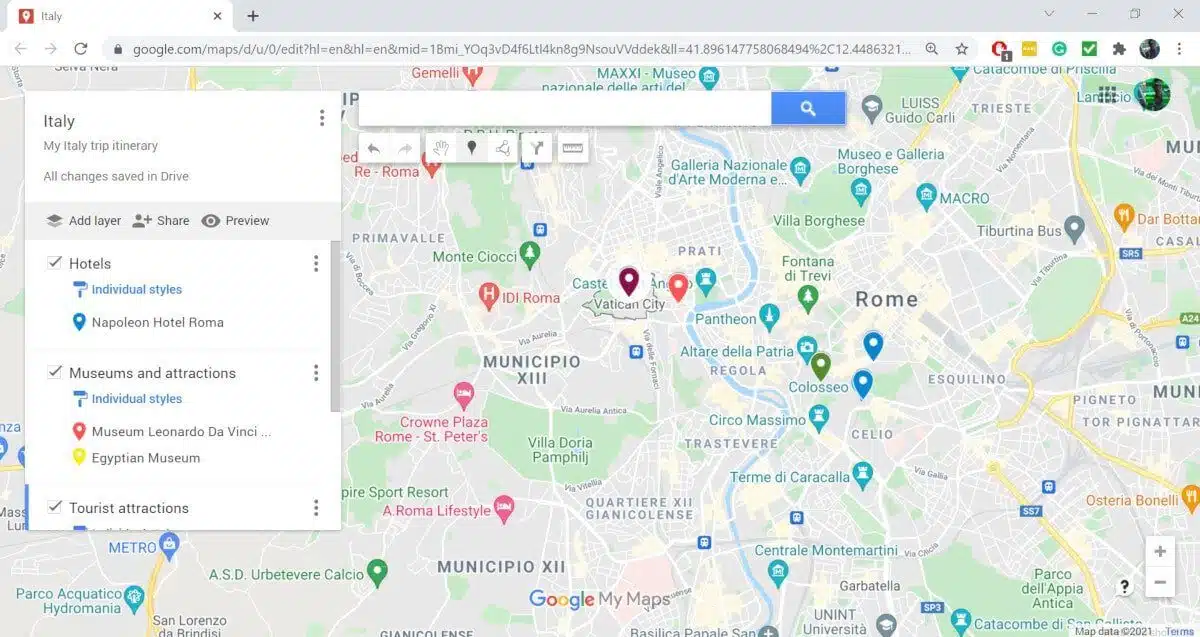
Start by clicking on the layer you want to add a location to (i.e. Hotels). Type in the name of your hotel into the search bar and hit enter.
When it appears on the menu, click “Add to Map”.

Google maps trip planner
You should then see your hotel appear in two places:
- As a marker on the map
- In the layer description on the left-hand side of the screen
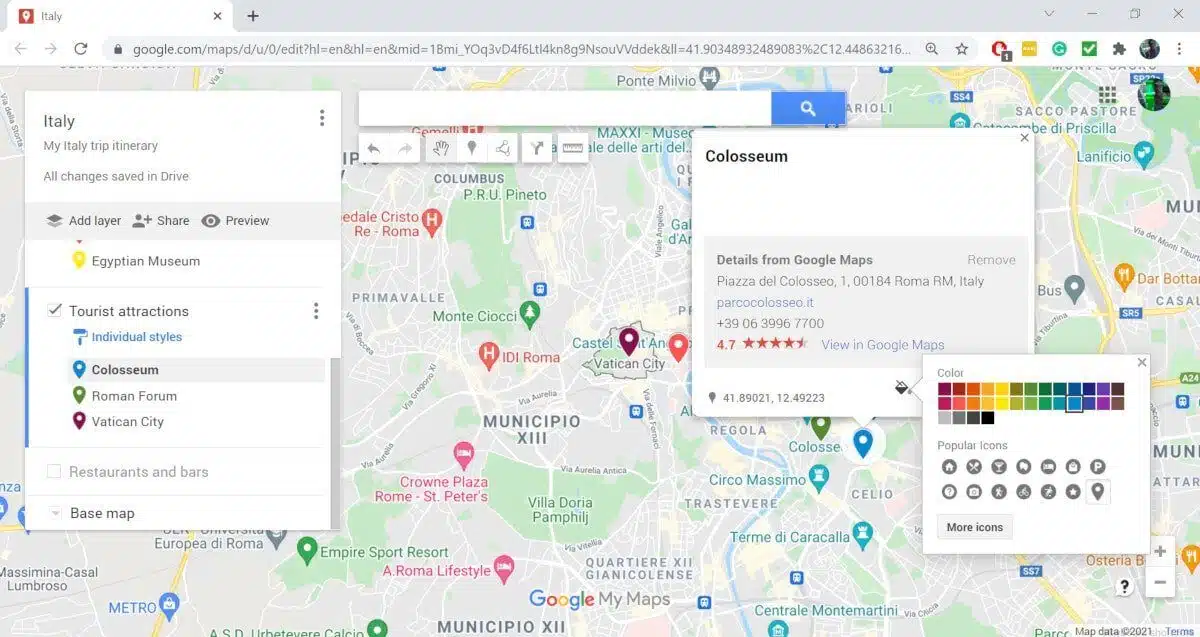
You’ll also notice there’s a description box where you can add important details you want to remember (find it by clicking the little edit/pencil button on the location!).
For example, you could write “Try the stuffed French toast” at a popular brunch spot or “Closed on Mondays” for a museum you want to visit.
If you accidentally enter a location under the wrong category, there’s an easy fix. Just drag and drop the location into the desired category on the left!
But what if there’s a site that doesn’t appear or auto-populate on Google maps, such as a particular park statue or a mural you want to visit?
No problem!
Simply use the “Add marker” feature and drop a labelled pin icon in the location.
Bonus Tip:
You can easily import locations from a spreadsheet or KML/KMZ files directly into your Google itinerary.
You can even import photos if you want to go wild with customising your Google map!
One of the many helpful features of google map trip planning is that you can colour code everything.
4. Colour-Code & Customise Your Google Map
Speaking of customisation, this is where you’ll really love the Google map trip planning feature.
You can create a beautiful, visually organized itinerary for every aspect of your trip!
The best way to do this is by creating your own colour coding for each category.
All you have to do is click on the paint bucket icon that comes up at the bottom of the location marker’s pop-up window.
Top Tip:
This is also an easy way to add in any personal notes you may have missed earlier.
Just click on the pencil icon and fill in any important details you want to remember. For example, “Uncle Ted loves this restaurant, be sure to order their signature margarita.” Or, “Suzie raved about this day spa, she said to book a Thai massage.”)
With all your notes customised, it’s time to create a colour system that makes sense to you.
You could try a priority system where you label “things I must see” items in green, “things I’d like to see” in yellow, and “things to see if I have time” in orange.
Another suggestion is to colour code broader categories into more specific groups.
E.g. You could mark shopping centres in purple, museums in red, and tour agencies in grey.
Top Tip:
Blue location markers tend to be difficult to spot on the map, especially if you have dozens of markers in one city. Try to brighten things up with other colours that stand out more on the screen!
Once you have everything organised, be sure to hit the “Save” button.
You’ll find everything stored neatly under its assigned category, along with the address, phone number, and website.
This will be invaluable when you’re ready to buy tickets to a show or book a table at a popular restaurant. You’ll have all the information you need right at your fingertips!
Here’s a quick run down of how to plan a road trip on Google maps, as well as walking and cycling routes in your Google itinerary.
5. Create Road Trips & Walking/Cycling Routes
There’s another feature you’ll love when planning a trip with Google maps:
DIY routes.
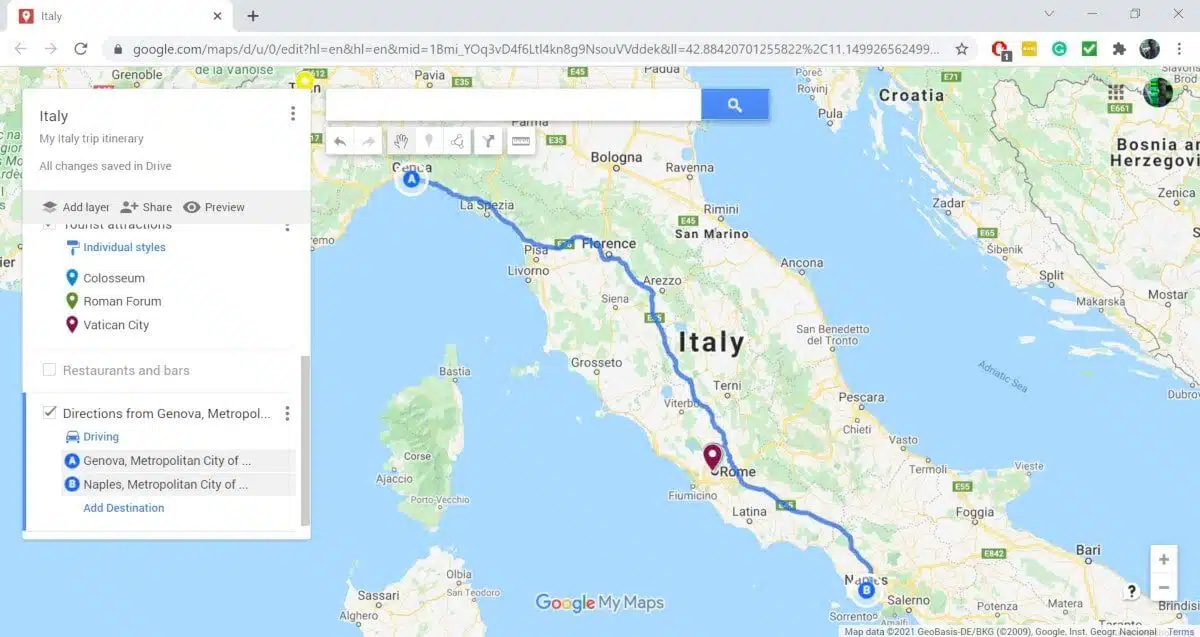
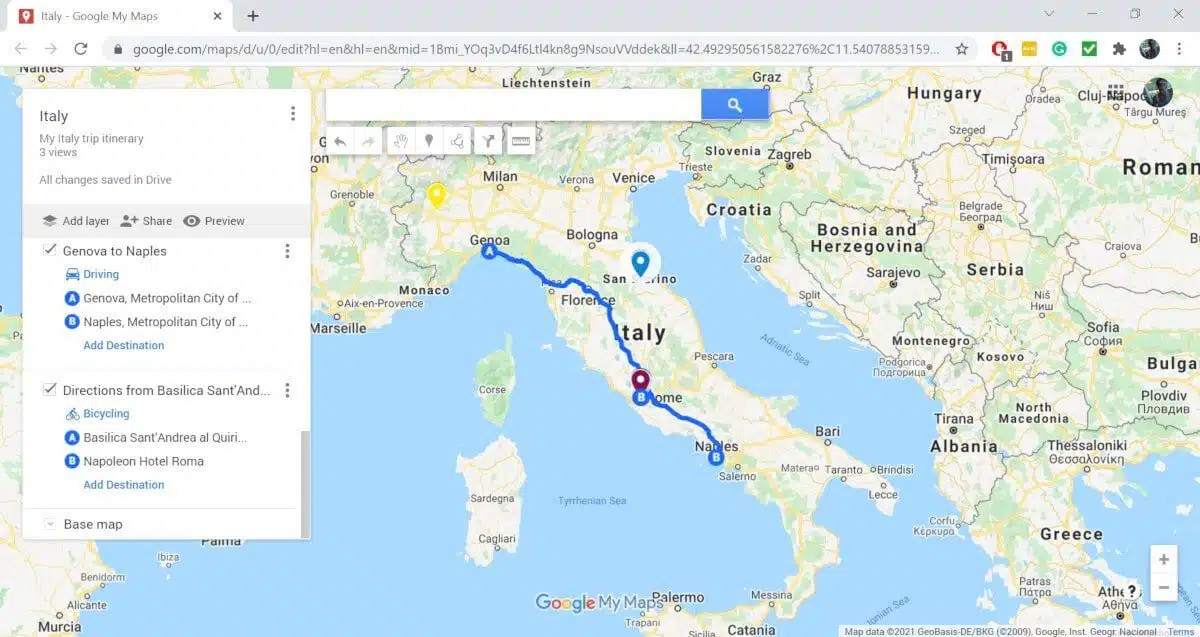
You can create your own driving, cycling, and walking routes (complete with stops) with just a few clicks.
To get started, click the “Draw line” icon. You’ll see four different options come up:
- Add line or shape
- Add driving route
- Add cycling route
- Add walking route
Once you’ve made your selection, click “Add direction.”
This will automatically add a new layer to your map that you can easily access later. After that, all you have to do is select Point A and Point B.
You can add up to 10 stops along the way, which you can always update, rearrange, or change later. If you want to alter the route, just drag the little white circle to the road or route you prefer.
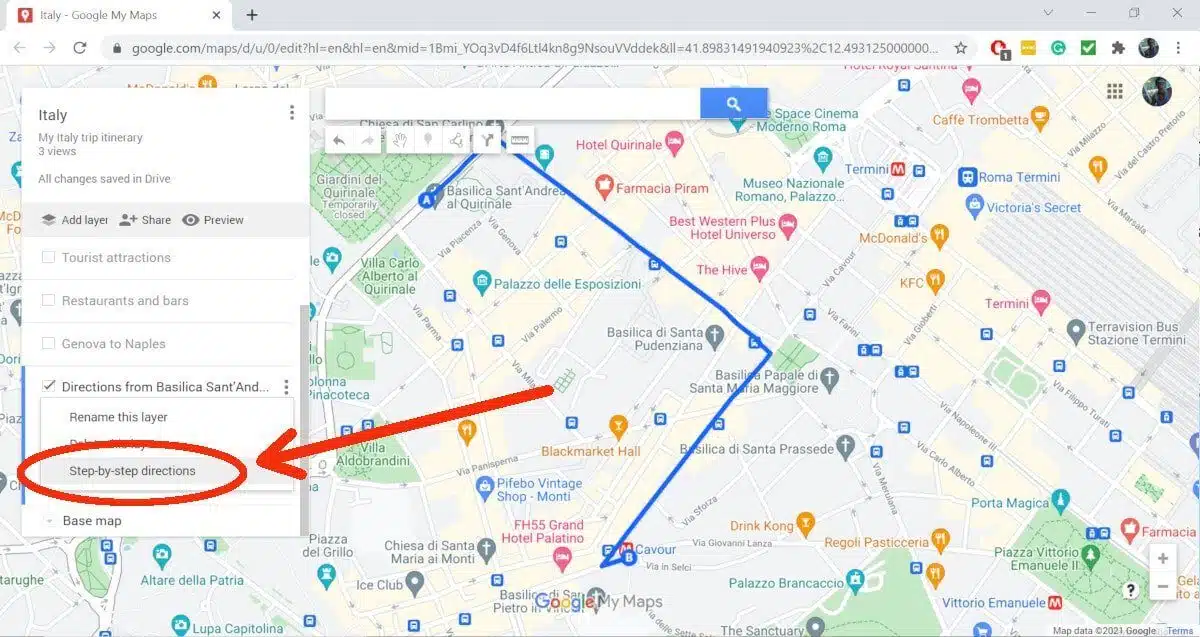
You’re probably already used to calculating drive times with Google maps, but did you know you can do the same with walking and cycling routes?
Just click the three little dots beside the direction name and select “Step-by-step directions.” This will provide you with a complete breakdown of travel time in minutes between each stop.
Bonus Tip:
Make sure you’ve downloaded Google maps onto your phone before you travel so you can access your custom maps (even if you’re offline).
You might also want to share your map itinerary with travelling companions or family members back home.
All you have to do is click the “Share” button under the map title and email it to your friends.
6. Plan Your Itinerary in Google Maps
Now that you know how to create a custom trip in Google maps, it’s time to use this information to plan your itinerary.
Zoom out until you can see all the locations you marked in the city, region, or country you’re visiting. This overview can help you make important decisions such as:
- Which neighbourhood to stay in
- Which hotel or vacation home to book
- Which airport, train station, or bus station to travel through
- Which activities or sites to group together
- Whether you need to rent a car, hire an Uber, or use public transportation
- Which attractions are within easy walking distance
You might also realize that a particular attraction is much further away from your hotel or other sites than you expected.
In that case, you could tweak your travel plans to include an extra day (or you may choose to skip that site altogether).
You can make better decisions about whether to visit certain sites independently or if it makes more sense to join an organized tour. You can also use this information to group activities and create a detailed itinerary for each day of your travels.
With that said, here’s my final tip for Google maps trip planning…
Last but not least when it comes to the Google maps trip planner: don’t go overboard!
7. Plan, But Don’t Overplan
Every successful trip requires some planning, of course!
For instance, you don’t want to plan your dream trip to Paris in the springtime, only to learn too late that the Louvre is closed every Tuesday.
Google maps trip planner is an excellent tool to help you visualize your itinerary and plan where to go each day. You can also view opening and closing hours and other helpful information for the sites you want to visit.
At the same time, don’t make the mistake of trying to fill every minute of every day.
Leave wiggle room in your itinerary to check out that awesome rooftop bar or share dinner with new friends from your walking tour. Learn how to go with the flow in case the weather’s bad or a “must see” site is closed.
In other words, don’t let a hiccup in your itinerary ruin your trip!
And no matter where you go, remember to keep your eyes open, slow down, and enjoy the moment. Remember: the whole reason we travel is to explore, discover, and have fun!
Google Map Trip Planning Made Simple
Google map trip planning can seem confusing when you’ve never done it before.
With a bit of practice, though, it’ll seem so easy you’ll wonder why you weren’t doing it sooner!
Google maps is a terrific tool to use when you travel, but it’s also helpful for planning your itinerary before you leave. You can visualise the exact location of everything you want to see and do, helping you plan each day and maximise your time.
Now that you know how to plan a trip with Google maps, all that’s left to do is plan your next adventure!
If you’d like some fresh inspiration for future travels, check out my list of 120 epic ideas for adventures.